
 English


Views: 0 Author: Site Editor Publish Time: 2026-09-28 Origin: Site


Navigating the technical specifications of a slit lamp microscope requires looking past flashy marketing claims. You must deeply understand how optical capabilities dictate everyday clinical utility. Clinicians often face a critical challenge during procurement. Misaligning a clinic's diagnostic needs with the wrong magnification system causes major downstream issues. It inevitably leads to inadequate clinical detail during critical exams, or it causes clinics to overspend on unnecessary optical complexity. Both scenarios negatively impact patient care and operational efficiency. This comprehensive guide breaks down the core optical metrics. We thoroughly examine total magnification, field of view (FOV), and various step systems. By the end, you will establish an evidence-based framework. This empowers you to properly evaluate, select, and standardize your ophthalmic examination equipment across different exam lanes.
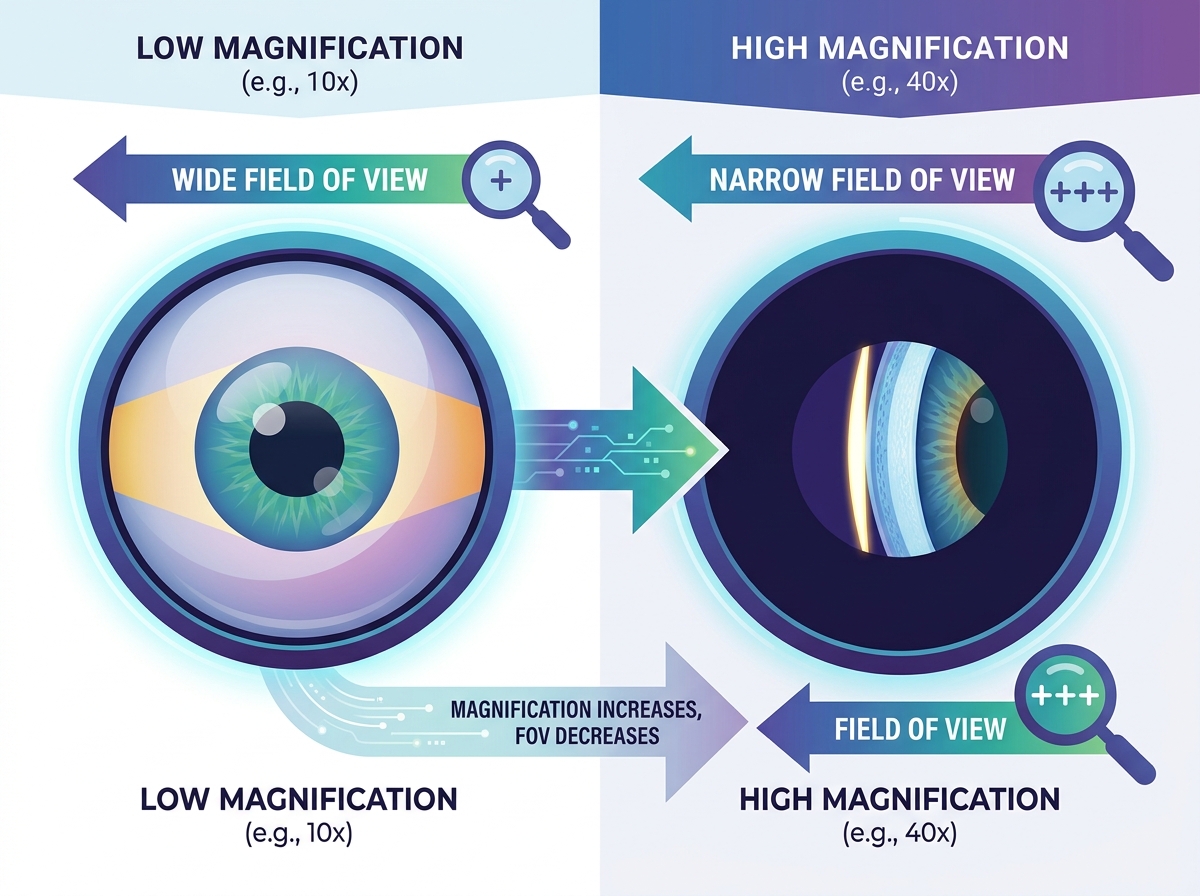
Total magnification and Field of View (FOV) share an inverse relationship; higher magnification inherently limits the observable area and reduces light transmission.
A three-step slit lamp is widely considered the clinical standard for general practice, balancing adequate detail with operational efficiency.
Evaluating slit lamps requires testing optical resolution at maximum magnification, where lower-quality optics reveal distortion and light loss.
Purchasing decisions should prioritize mechanical stability and optical clarity over simply maximizing magnification steps.
Optical principles govern every eye examination. Understanding these foundational rules prevents frustrating diagnostic errors. Practitioners must grasp how optics behave before attempting to diagnose subtle pathologies.
Clinicians must calculate total magnification accurately to understand their visual limits. You achieve this calculation by multiplying the eyepiece power by the objective lens power. Most modern systems utilize a standard baseline configuration. Manufacturers typically install 10x or 12.5x eyepieces as the default. They combine these oculars with variable objectives housed inside a rotating mechanical drum. If you use a 12.5x eyepiece alongside a 2x objective, your total magnification equals 25x. Understanding this mathematical relationship is fundamental for daily operations. It prevents clinicians from misinterpreting the physical limits of their devices. Different manufacturers might use varied objective powers to reach similar total values. Always check the specific ocular power before assuming a device meets your visual requirements.
Optical physics enforces a strict, unavoidable inverse relationship. As total magnification increases, the Field of View (FOV) aggressively decreases. You cannot bypass this physical limitation through software or technique. A larger FOV provides essential spatial context during ocular exams. When you zoom in tightly, you immediately lose surrounding anatomical landmarks. High magnification becomes completely useless if you cannot orient your view. A severely restricted FOV forces you to constantly hunt for the target lesion. This wastes valuable clinical time and frustrates light-sensitive patients. Finding the perfect balance is a vital daily practice. We strongly recommend starting wide to map the area. You should only increase magnification once you precisely center the pathology in your view.
Pushing your device to higher magnification triggers two additional optical penalties. First, higher magnification drastically shrinks your depth of field. You will struggle to keep anterior and posterior lesion borders in focus simultaneously. The focal plane becomes razor-thin when operating at 40x magnification. Second, high magnification severely diminishes perceived image brightness. Light scatters over a much smaller physical area, causing the image to darken. Superior light source engineering helps compensate for this unavoidable light loss. LED illumination systems generally outperform older Halogen bulbs in this specific scenario. LEDs deliver a crisper, whiter light profile without generating excessive heat. They maintain excellent brightness and contrast even when pushed to their maximum optical limits.
Selecting the right magnification drum defines your diagnostic capability. Let us explore the three dominant step configurations available in clinics today.
A 2-step system typically offers basic 10x and 16x magnification options. High-volume triage centers frequently deploy these straightforward models. They perform exceptionally well for basic contact lens fittings and rapid screenings. Mobile clinics also prefer them due to their compact, lightweight design. Their primary advantages include a low purchase cost and high mechanical durability. Fewer moving internal parts translate directly to fewer mechanical failures over time. However, their clinical limitations are severe and noticeable. They remain totally insufficient for detailed posterior segment evaluation. You will also struggle to perform thorough endothelial cell assessments. They simply lack the optical horsepower needed for identifying advanced micro-pathology.
A three-step slit lamp usually provides 10x, 16x, and 25x magnification settings. This specific configuration serves as the standard workhorse for general optometry. Primary ophthalmology practices rely heavily on this setup for daily routines. It provides the essential mid-tier magnification needed for most anterior exams. You can evaluate corneal dystrophies and inflammatory cells effectively at 25x. It deliberately avoids the mechanical complexity inherent in larger optical drums. You also bypass the steep price premium associated with top-tier specialty models. For most general practitioners, this strikes the perfect functional balance. It handles almost every routine diagnostic task seamlessly and reliably.
A 5-step system offers a vast optical range, typically spanning 6x, 10x, 16x, 25x, and 40x. Specialty clinics and cornea specialists demand this extreme level of optical versatility. It excels in advanced pathology documentation and complex surgical planning. It offers unparalleled versatility and extreme microscopic detail for delicate structures. However, wielding this much power carries distinct operational risks. The heavy Galilean drum experiences a higher risk of mechanical wear. The complex internal gear mechanisms require delicate handling and frequent professional calibration. Furthermore, examining patients at 40x requires absolutely excellent patient fixation. Any slight head movement immediately ruins the delicate focal plane.
System Type | Typical Magnification Steps | Best Clinical Use Case | Key Disadvantage |
|---|---|---|---|
2-Step | 10x, 16x | Mobile clinics, triage lanes | Insufficient for detailed posterior segment exams |
3-Step | 10x, 16x, 25x | General optometry & ophthalmology | Lacks ultra-high magnification for endothelial assessment |
5-Step | 6x, 10x, 16x, 25x, 40x | Cornea specialists, surgical suites | Higher risk of mechanical wear and gear misalignment |
You must purposefully align your magnification choices with specific procedural demands. Using the wrong optical setting obscures critical diagnostic data.
Low magnification delivers a broad, highly forgiving field of view. Clinicians use this range primarily for a general anterior segment overview. It allows you to quickly assess overall eye health and symmetry. You can efficiently perform adnexa examinations and thoroughly evaluate lid margins. It serves as the absolute ideal starting point for initial fluorescein evaluation. The wide spatial view captures massive tear film patterns instantly. We always recommend starting every single exam at this low level. It builds a necessary geographical map of the patient's entire eye. Jumping to high magnification too early consistently causes spatial disorientation.
The medium range represents the true "working range" of standard ophthalmic exams. You will undoubtedly spend most of your clinical time transitioning between 16x and 25x. This specific level excels at evaluating distinct corneal layers sequentially. You can easily identify subtle micro-abrasions and early-stage stromal infiltrates. It provides adequate detail to confidently assess the anterior chamber for cells and flare. Furthermore, this mid-range setting supports general funduscopy beautifully. When you pair it with handheld auxiliary lenses, the optic nerve appears crisp. The careful balance of brightness and detail peaks perfectly in this zone.
High magnification is strictly reserved for highly focused, microscopic clinical assessments. You employ this extreme range when evaluating the fragile corneal endothelium. It helps clearly identify Fuchs' guttae and discrete structural anomalies. Cornea specialists rely heavily on 40x to assess graft rejections post-surgery. You can also perform incredibly detailed posterior pole examinations for macular pathology. However, mastering this magnification requires significant clinical patience and steady hands. The sharply diminished FOV and dark visual field heavily test your mechanical skills. You must master delicate joystick control to track microscopic lesions effectively.
Clinical directors face tough decisions when standardizing equipment across multiple locations. We advise you to systematically map equipment to specific lane functions.
Identify the single most demanding procedure performed in each specific exam lane.
Equip high-volume triage and contact lens fitting rooms with robust 2-step or 3-step models.
Reserve delicate, complex 5-step systems exclusively for specialty lanes handling severe pathology.
Standardize eyepiece powers (e.g., all 12.5x) across all facility devices to reduce staff confusion.
Ensure consistent light source types to match color temperature expectations during multi-doctor reviews.
Purchasing reliable diagnostic instruments goes far beyond reading glossy marketing brochures. You must physically evaluate the optical track record of each device.
Clinicians must thoroughly understand the dangerous concept of "empty magnification." Increasing numerical magnification without supplying sufficient optical resolution yields a terrible image. The target appears physically larger, but it remains decidedly blurrier. High-quality glass preserves crisp edge sharpness as you scale up the magnification. Low-quality optics simply stretch a poorly resolved, fuzzy image across a wider area. You gain absolutely no additional diagnostic information from this scaling. Always prioritize superior lens resolution over higher numerical magnification capabilities. A crisp, bright 25x view easily outperforms a muddy, distorted 40x view.
Optical clarity relies heavily on deeply solid mechanical foundations. High magnification severely amplifies even the most microscopic environmental vibrations. A slightly wobbly instrument table completely ruins a 40x endothelial exam. You must physically test the joystick and base stability in person. Push the magnification drum to the absolute maximum setting available. Rest your hand gently on the joystick while viewing a stationary test target. Watch for excessive bouncing, drifting, or shaking in the visual field. The base should glide smoothly without any jerky, sticking, or grinding sensations.
Optical complexity naturally blocks internal light paths through lens absorption. We instruct buyers to carefully evaluate image brightness at the highest optical step. Subpar equipment will show a noticeable and highly detrimental drop in illumination. The image will turn a muddy, dark yellow, obscuring fine details. Top-tier instruments utilize advanced anti-reflective lens coatings on every glass surface. These coatings preserve maximum light transmission across complex multi-lens arrays. Switch between the lowest and highest magnification rapidly during your test. Pay close attention to the brightness differential; it should remain clinically usable.
The magnification changer serves as the literal mechanical heart of your device. It should engage with a distinct, deeply tactile click at every single stop. You should clearly feel the internal gears lock firmly into place. Furthermore, the optical system must maintain perfect parfocality throughout the range. Parfocality means the focal plane remains entirely stationary when you change magnification steps. If you focus perfectly at 10x, the image must remain perfectly focused at 25x. Equipment losing focus during step changes wastes enormous amounts of clinical time.
Upgrading your diagnostic fleet requires careful financial and operational planning. Avoiding over-speccing protects your operational budgets and simplifies staff training.
Practice managers must address the hidden business risk of over-speccing equipment. Equipping every single lane with a delicate 5-step system rarely makes financial sense. Often, a three-step slit lamp meets 95% of daily clinical needs perfectly. Buying excessive optical power for basic exam lanes heavily reduces your Return on Investment. You tie up crucial capital that could fund other essential clinical technologies. We suggest adopting a smart hybrid procurement model instead. Install advanced scopes only where doctors perform specialized, high-acuity procedures regularly.
Never purchase complex optical devices completely sight unseen. You must execute a strict, standardized evaluation process before committing any funds.
Request working demo units in an actual clinical setting, avoiding the deceptively bright trade show floor.
Test depth of perception meticulously on a known anatomical target at all available magnification steps.
Check rigorously for chromatic aberration, looking for unwanted color fringing at the extreme edges of the FOV.
Evaluate the joystick tension carefully to ensure it matches your specific ergonomic preferences and hand size.
Inspect the patient chin rest mechanics for long-term durability and smooth elevation control.
After thorough testing, compile your findings to establish a concise equipment shortlist. Base your final decisions on a proven optical track record and peer reviews. Examine the warranty terms covering mechanical parts extremely closely. You should specifically question the coverage limits on the magnification drum mechanism. The drum remains the most frequent point of mechanical failure in busy clinics. Finally, secure clear, written guarantees regarding post-sale calibration and maintenance support. Your chosen vendor must provide rapid local service to prevent prolonged clinical downtime.
Your procurement mindset requires a strategic and evidence-based shift. Do not buy diagnostic tools based purely on the highest magnification number printed on the box. You must base your purchase on optical clarity, mechanical reliability, and exact clinical workflow requirements. High magnification without crisp resolution is clinically useless and potentially misleading. Align the step selection directly with your clinic's actual specialty level and daily patient volume. We strongly urge you to prioritize hands-on evaluation of the FOV and light transmission. Test these variables rigorously before issuing any final purchase order. Thoughtful selection guarantees sharper clinical views and much smoother daily operations.
A: A Galilean system uses parallel optics passing through a rotating drum of lenses to change magnification in discrete steps. This allows for easy integration of beam splitters. A Greenough system utilizes converging optics, providing excellent stereoscopic depth perception. Greenough systems generally offer smooth zoom capabilities but are less common in modern high-end ophthalmic setups due to accessory integration limits.
A: Most optical heads feature a fixed Galilean drum that you cannot upgrade post-purchase. However, you can sometimes swap the standard 10x eyepieces for 12.5x or 16x oculars. This swap mathematically increases your total magnification range. Remember that swapping eyepieces will simultaneously decrease your overall field of view and may lower perceived brightness.
A: Continuous zoom offers smooth, uninterrupted transitions, helping you maintain target lock during magnification changes. However, this flexibility involves a distinct trade-off. Zoom systems often sacrifice absolute optical sharpness and light transmission compared to discrete Galilean step systems. High-end discrete steps generally provide crisper edge-to-edge resolution for identifying subtle pathologies.
A: Auxiliary lenses introduce their own optical power, creating a compounding effect. A higher diopter lens (like a 90D) provides a wider field of view of the retina but yields a smaller magnified image. Conversely, a 78D lens offers higher intrinsic magnification but drastically narrows your retinal field of view. You must constantly balance the slit lamp's magnification with the lens power.


